Velkommen til Norges eneste Hyundai Forum. Logg inn for å delta i diskusjoner, eller les forumet som gjest.
Vil du reagere på denne meldingen? Registrer deg på forumet med noen få klikk eller logg inn for å fortsette.


IndeksIndeks   Om  Kontakt  Latest imagesLatest images  SøkSøk  Bli MedlemBli Medlem  Logg InnLogg Inn  
I samarbeid med Soundergy


Følg HFN på facebook

Søk


Display results as :
 
Rechercher Advanced Search
Latest topics
» IX35 Fuel Cell
Gear Link- modifikasjon EmptyTir Jan 11, 2022 3:28 pm by dessen.lars@gmail.com

» IX 35 Startproblem
Gear Link- modifikasjon EmptyMan Jan 10, 2022 6:10 pm by Tobben

» Feilkode P1512
Gear Link- modifikasjon EmptyOns Jan 05, 2022 2:30 pm by smyre

» Parkerings skade.
Gear Link- modifikasjon EmptyFre Okt 08, 2021 11:54 pm by harald

» Fjernkontroller / dør åpnere virker ikke 2006 Santa Fe
Gear Link- modifikasjon EmptySøn Sep 06, 2020 6:09 pm by Roan

» Boltsirkelen
Gear Link- modifikasjon EmptyOns Sep 02, 2020 9:23 pm by Tormod

» Radiator problem
Gear Link- modifikasjon EmptyTir Mar 10, 2020 6:27 am by harald

» Er 1.6 & 2.0 Girkasse helt like?
Gear Link- modifikasjon EmptyMan Mar 09, 2020 12:41 am by KNUTJAR@GMAIL.COM

» Feil i bremselys bryter.
Gear Link- modifikasjon EmptyLør Okt 12, 2019 4:46 pm by JanOlav


 Gear Link- modifikasjon

Go down 
2 posters
AvInnlegg
iHouse
Moderator
Moderator
iHouse


Antall Innlegg : 163
Points : 196
Reputation : 0
Join date : 07.02.2011
Age : 33
Bosted : Larvik
Job/hobbies : Deltid selger & Service-ansvarlig, Elkjøp Express Larvik

Gear Link- modifikasjon Empty
PosteTema: Gear Link- modifikasjon   Gear Link- modifikasjon EmptyMan Feb 07, 2011 10:40 pm

Skal oversette etterhvert. Smile

_________________________________

Some owners of the gen1 and gen2 have noticed the poor gear change. Below are details on how to improve it.

Thanks to Jon (kupsjon) for the DIY
---------------------------------------------

Right then at last I’️ve put together a little description and a few pics of what I did to take up the slack in the gear linkage. This is so simple to do but its amazing how much better it makes the gear change feel. The first pic shows the bad points and the bolts and pin that need to be removed to get the linkage out. In the first pic it shows the washer and dowel/sleeve already fitted.

Gear Link- modifikasjon Diy_gearlink_1


First off you need to remove the two bracket bolts and the R pin to make life easier, then you should be able to lift the whole lot away from the gear box with it only being attached to the cable still.

Gear Link- modifikasjon Diy_gearlink_2

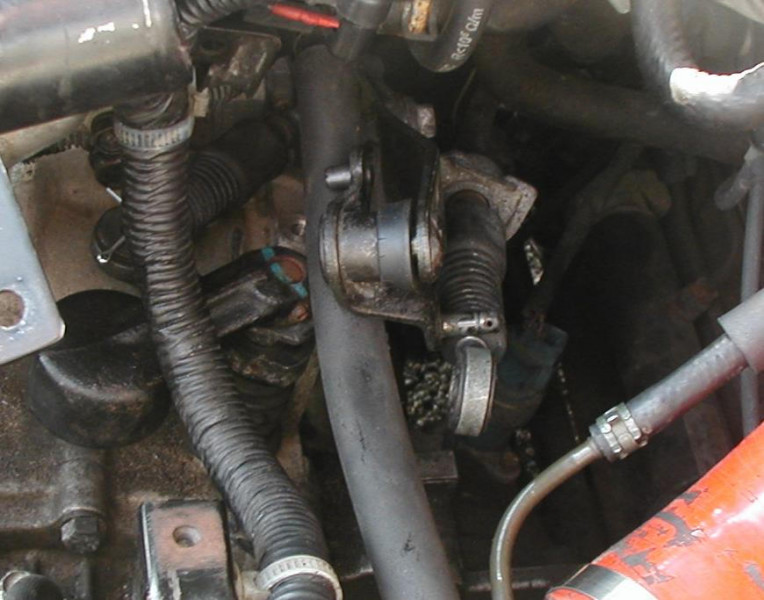
As you can see in the above pic there is a gap at the side of the rubber grommet and the right hand linkage. These linkages are only supposed to move up and down but as there is a large amount of free play when they move, they also move from side to side. I would say this is one of the reasons why our gearboxes don’️t locate smoothly as well as the excess slack in the stick. Once you have it like this the left hand part will just slide off leaving you with this.

Gear Link- modifikasjon Diy_gearlink_13

For the first bad point it is as easy as putting a washer on the right side of the grommet when you reassemble. Or if you have the same problem as Shaddoh had, where his grommet was split and worn he just removed it and replaced the whole lot with 2 washers. The second bad point seems to vary from year model. We are not sure if this is what Hyundai did when they made the gears a bit better after 2000. The top peg on the left is the part that locates into the gear box main shaft. This peg locates between two lips to move it up and down. However on mine there was a massive amount of difference in the size of the peg and the gap between the lips. Translating to lots of free play in the stick. So all I did was to get a piece of steel bar with an 8mm internal bore and turn it down to the correct size to remove the slack. On Shaddoh’️s linkages there was a plastic button on the end of this peg so he didn’️t need to do this part. But if yours hasn’️t or is worn this will remove a lot of free play and will last a lot longer than the plastic.

Gear Link- modifikasjon Diy_gearlink_4jpg

Then all that is left to do is reassemble the linkages back together ( not forgetting to add the washer). It’️s as simple as that, even if you have the plastic button on yours and it is fine, it is still worth doing. As I said Shaddoh had the button on his but he still felt a lot of difference just by putting the washer in there. santa
Til Toppen Go down
Håvard
Administrator
Administrator
Håvard


Antall Innlegg : 375
Points : 502
Reputation : 1
Join date : 29.12.2010
Age : 33
Bosted : Gjøvik
Job/hobbies : Audioingeniør

Gear Link- modifikasjon Empty
PosteTema: Re: Gear Link- modifikasjon   Gear Link- modifikasjon EmptyMan Feb 07, 2011 11:02 pm

Har du prøvd dette selv?
Til Toppen Go down
iHouse
Moderator
Moderator
iHouse


Antall Innlegg : 163
Points : 196
Reputation : 0
Join date : 07.02.2011
Age : 33
Bosted : Larvik
Job/hobbies : Deltid selger & Service-ansvarlig, Elkjøp Express Larvik

Gear Link- modifikasjon Empty
PosteTema: Re: Gear Link- modifikasjon   Gear Link- modifikasjon EmptyMan Feb 07, 2011 11:05 pm

Nope, men har lyst til.
Til Toppen Go down
Håvard
Administrator
Administrator
Håvard


Antall Innlegg : 375
Points : 502
Reputation : 1
Join date : 29.12.2010
Age : 33
Bosted : Gjøvik
Job/hobbies : Audioingeniør

Gear Link- modifikasjon Empty
PosteTema: Re: Gear Link- modifikasjon   Gear Link- modifikasjon EmptyMan Feb 07, 2011 11:43 pm

Spørs nok om man ikke må ta seg en kikk til våren ja.. kan vel bli bra sammen med short shift : )
Til Toppen Go down
Sponsored content


Gear Link- modifikasjon Empty
PosteTema: Re: Gear Link- modifikasjon   Gear Link- modifikasjon Empty

Til Toppen Go down
 
Gear Link- modifikasjon
Til Toppen 
Side 1 av 1
 Similar topics
-
» Automat gear filter og olje bytte.

Permissions in this forum:Du kan ikke svare på temaer i dette forumet
 :: DIY :: DIY-guide/gjennomføring-
Gå Til: